December 31, 2012

2013: 52 Card Challenge

One of the ideas that is talked about a lot in Physical Therapy is helping clients/patients set SMART goals aka. Specific, Measurable, Achievable, Realistic, & Timely. By setting SMART goals he or she will have measurable results showing whether or not they are improving. Therefore using this theory, I will only know if I am improving if I set SMART crafting goals (I suppose you could call it a New Years Resolution but then I am likely to not keep it).

Goal: To make one card each week between January 1, 2013 to December 31,2013. I must post the card by 11:59pm on Sunday evenings (hopefully). 
  • I plan to make at least 36 Christmas cards. This would mean I make 3 Christmas cards every month.
  • The other 1-2 weeks in a month will be dedicated to other occasions (birthdays, weddings, Valentine's Day, engagements, Mothers Day, Fathers Day, etc.)
Now that this is out there for the world to see I will be forced to stick with it. So here goes nothing...

December 24, 2012

A Very Pinterest Christmas

Merry Christmas Everyone!

As my Christmas gift to you check out my favourite Christmas craft pins on my "Very Crafty Christmas" board.

Ho Ho Ho!

December 22, 2012

New Year --> New Layout

2013 is just around the corner. Well around 10 days (depending how you count it) to be exact. I decided that with this new year I want to get a little bit more involved with the crafting community. In order to do so I thought the blog needed a bit of a facelift to reflect the title and make it more memorable.

I'm currently no computer wiz or photoshop genius so I used iWeb, which I already had on my computer. I started by creating a design in my head first. You are simply wasting time if you don't even have a vision of what you want. I chose theme colours to carry throughout my blog. Once in iWeb I manipulated simple shapes to create this overall background. Once completed:


I saved it as a jpg, which allowed me to upload it as a background in blogger. If you are efficient with html and css that I am certain there are better ways to do this but for bloggers who want a simple solution this worked out great for me. Let me know what you think and any suggestions for change you may have. I have a couple ideas for the blog in mind for the new year! I will let you know as it gets closer...

November 5, 2012

CAS... Cathy's Awesome Stamps??!


I learned about a new style recently from my reading my sister's blog. CAS or Clean and Simple is about using limited embellishment allowing your focus image to stand more against your neutral background. I have automatically been exploring these cards lately, not just for the style, but because I love how quickly I can make one. You can check out more CAS cards on SplitCoastStampers if you need some inspiration. 


The end of October is a busy birthday month! There are three birthdays including the boy. While in the middle of studying for midterm exams, the boy asked me to make a card for his mother's birthday. Normally I may have some ready made but I ran out of those a couple months back. After reading about CAS it was the perfect opportunity to try it out. I use the phrase stamp that I had and some old die cuts I had made for Christmas cards originally. Probably took 10 minutes. Love it! 


TIP: Rounding the corners on any CAS card really finishes it off and gives it some character. You can get a rounded corner punch at Michaels or even Walmart.

October 19, 2012

Christmas comes early this year...

In September of this year I went back to school to complete my Master's in Physical Therapy. Although I absolutely love it, other areas of my life have been lagging. Crafting definitely being one of them! However, one night before midterms I was able to come up with a quick Christmas card that only takes 15 minutes to make. The goal this year was to come up with a few quick Christmas card ideas that won't take all season to make. I got this idea off Pinterest from a kid's craft idea. You can see another version on Meet the Dubiens


Fingerprint Christmas Lights
1. I started with a Copic Multiliner Black Marker to draw the light string.
2. I have a box of pre-folded cards that someone bought on sale for me. I used one of these colours that I could use up hard to match colours.
3. Use your index or pinky finger to print the lights. You can see the green colour is bigger because I started with the index finger and switched to my pinky. 
4. Start with lighter colours, and end with the darkest colour because I definitely had ink on my fingers for at least a day.

Alternate ideas: 
  • Try the same card but use a stamp that has just the string on it. Try this one from The Rubber Cafe. You can  use just the string of lights or if you don't feel like getting your fingers  dirty, use the included lights.
  • Get the whole family involved and have them all stamp their fingerprints. It would mean so much more when your family and friends get the card. 


Stamp Pads: Stampin' Up


September 1, 2012

DIY Chalkboard Water Pitcher

Having just moved in to our new apartment in preparation for going back to school, all of my crafts have been "DIY Home Decor" orientated. This idea actually originated from the boy out of an old GQ issue. Basically we bought a small Brita water pitcher but we knew that we drank too much water to use such a small pitcher. So the boy suggested that we use old wine bottles, fill them up with the filtered water then re-fill the Brita so that we are never without water. Since the idea was so cheap and involved drinking wine I was all over it! I came up with the idea of painting the labels with chalkboard paint as not to confuse it with the wine in the fridge (not that, that would be such a bad thing). I have been dying to try the chalkboard paint and was soooooo happy with the result!

Materials:

  • Empty Wine Bottles
  • Small bottle of Acrylic Chalkboard Paint (in any desired colour)
  • Foam Paintbrush
  • Masking Tape (I'm sure Painters tape would work even better but I am cheap and prefer to use things that I have around the home)

1. Use the masking tape to tape around the outside of the label. I used little ripped off pieces to tape off the rounded corners. You can skip this step if you prefer an entire painted bottle look.


2. Follow the directions on the acrylic bottle with regards to painting. I painted the wine bottle vertically first, then let it dry for an hour. Once dry I came back and painted it in the opposite direction (horizontally). I sponged over some of the lettering to get maximum coverage.  I found the raised lettering was the most difficult to cover.


3. Leave the bottles to dry for 24 hours. After 24 hours, peel off the masking tape. 


4. And PRESTO! Go ahead and write all your new Chalkboard Water Pitcher.

NOTE: This would also be a great way to label table numbers for a wedding. 

July 31, 2012

DIY Vases

What's better than a good paper project? A great crafty home decor idea. I love sifting through pinterest to come up with new projects. I found this original project from "How Does She?"Being sick this weekend, I had lots of time between sleeping to create this pop coloured vases. 

1. Pick up some different sizes and shapes of vases. I took a couple that were given to me by the boy. The big ones I picked up from the local thrift store (you can get them for .99 to 1.99 at Value Village). 

2. Using Acrylic Enamel Paint, paint the inside of the vase. Use foam brushes. (I painted two coats since it looked so streaky) 


3. Let the vases dry for one hour. 

4. Put the vases in the oven. Preheat the oven to 350 degrees Celsius. Bake for 30 minutes then let the vases cool in the oven. 

5. Take then out and presto!

Couple Tips:
  • I didn't use the clear medium that "How Does She?" did. They do not sell it in single bottles in Canada's Michaels stores.
  • I am going to do another coat on the medium yellow vase. The lighter colours don't cover quite as well. Keep that in mind when picking your colours


June 11, 2012

Here Comes the Bride

Wow! Long time no post. Sorry for the lack of posts but it has not been due to lack of crafting. We have had three weddings (one still to come in Maui) within a very short period of time. At least I have been able to "research" for our own wedding. Anyway, The inspiration for the layout of the wedding cards is from Mojo Monday, however I did not post them on the site because we have been away for some of these wedding.


Another Menu Board for a bridal shower I attended recently. To see how to make one check it out here.


Patterned Paper = Recollections
Black Glittered Paper = Recollections Precious Metals


I found this stamp in the $1.50 bin at Michaels. I think it was a mistake but it was good for me.
Not too bad! I have already completed one more but the wedding is still coming up in two weeks. I will blog then.
Happy Crafting!!

May 7, 2012

What's for dinner?! Menu Board

The boy and I have been discussing moving out this summer since I will be going back to school. With that comes budgeting and buying kitchen supplies. One of things we have decided on is making a weekly menu on Sundays in order to make grocery shopping and cooking streamlined. Since we will be in school we don't want to waste time and money in the grocery store. So while exploring on Pinterest I saw some great Menu Board ideas but I really loved this idea by Fab Fam Five.


So here are some instructions on making my version of this Menu Board:

1. You will need an 10" x 13" frame, alphabet stickers (x2) and 2 - 12"x12" pieces of pattern paper.

2. Cut the paper lengthwise so that it is now 10" x 12". You will need to add on an extra inch of paper from the second sheet. I stuck this in place by using Sookwang double sided tape.


3. Measure out the paper into 8 sections. Mine had 8 sections of 1.625 inches. This gave me room for the title and 7 days of the week.

4. Start sticking on your lettering. The style of alphabet that you use will really give the mood of your menu board. I love modern, clean lines but in bright colours. I thought this lettering spoke to this well. 


5. Pop the paper into the frame. Use an expo pen (non-permanent marker!) to write out that week's menu.

TIPS:
  • Look for weekly deals and coupons at craft stores like Michael's. I was able to buy this frame for $7.20!
  • Use a ruler to lay down the letters. I learned this the hard way and had to peel off the letters and re-do it.
  • Leave some space on left hand side so your letters don't get cut off by the frame like mine did here. 

What do you think would you hang one in your home? Any suggestions for improvement? Oh and what's for dinner?


Ready, set, retire!

I finished my first half marathon yesterday, which means its time to get back to crafting! The boy asked me a couple days ago to make a retirement card for someone close to him. He also gave me the challenge of trying to incorporate a bicycle. However, he didn't like my cow and chickens on a bicycle stamp (For A Spin by Penny Black). I decide to go the rest and relaxation route instead. This charming Riley and Company stamp definitely made me think of a Canadian retiring! I really like the double matting on this stamp.


Ready, set, recline!
Stamp: Hammock Riley by Riley and Company


April 30, 2012

Viva Las Vegas Wedding Invite

Whenever I am not crafting I am probably running. Recently I have been training for a half marathon, which is why my posts have been lacking. In excitement of my first half marathon coming up this weekend I found another half marathon in Las Vegas. It is called "Strip at Night" and is part of the Rock n' Roll Series. Basically you run from one end of Las Vegas Blvd to the other at night in December. However, I will be going back to school this September so trips to Vegas will be a no go. So while dreaming of running this half marathon I came up with the idea of combining running this half marathon with my wedding. We had discussed having a Vegas wedding already so the run just made the wedding even more "us". 

So what does this have to do with my paper projects? I found a great Las Vegas typography wedding invitation set on minted. However, being a crafter I wanted to see if I could replicate this using Microsoft Publisher. This was my first time using Microsoft Publisher but I am pretty happy with the result.


Of course the date, location, and time are all arbitrary. This won't be our wedding invite for sure but I had a lot fun playing around with Microsoft Publisher in order to complete this. I simply used clipart, shapes, and textboxes to create this invitation.

What do you think? Would you use an invitation like this? How would you change it?

Happy Wedding Planning!

April 2, 2012

Hope Your Birthday is a Hoot

With another birthday recently passed I have officially entered another tick box. I received many wonderful birthday cards this year. But I also received some new card supplies.  Nothing like a birthday to help inspire cards.


Hope Your Birthday is a Hoot

New Owl Stamp! from The Greeting Farm

Challenges this Card meets:

Sorry for the short post. This is a bit late for me!

March 26, 2012

You Put a Spring in My Step...

After getting my blog out there a little bit more last week I was very excited to participate in some more challenges this week. The bonus for me was that I really did feel challenged this week trying to incorporate all the challenges I chose.

You Put A Spring in my Step


Challenges this Card Qualifies for:


What are your favourite challenge sites?

March 19, 2012

Father's Day Mojo

This card is really exciting! For the first time I am entering into a contest and using another website's design for my card inspiration. I love getting layout ideas for other people. This inspiration comes from Mojo Monday.  I also tried to add an extra level of difficulty by creating a manly feeling to the card. The flower on the layout automatically gives it is a feminine touch. However, I used alternating stars to give it a flowerish design. Not bad for my first time I think!


Father's Day Mojo
Patterned Paper: Recollections 

Oh and if you noticed the journaling I got the corner rounder punch from Walmart (Paper Shapers - Corner Adorner). I am really impressed with it!

March 13, 2012

Chirp Chirp ... Fail!

In every life a little rain must fall. Cliche I know! However, it is spring time, which means Easter is just around the corner. I've never given Easter cards before but if I don't how do I use this cute stamp and paper?

There is one problem with today's card... I don't like it! I thought I'd try a new stamp effect on the title but I don't like it or perhaps it's the colour. Oh well! As I said RAIN.

Here are the details for today's card:

Stamp = A Good Egg by Stampin Up
Stickers = Creative Memories
Ink Pad = Stampin Up
Yellow paper = Stampin Up
Pattern paper = My Minds Eye: Quite Contrary . Jack and Jill
Markers = Crayola Super Tips

Here is a great gallery with ideas of how other crafters used this stamp: http://www.splitcoaststampers.com/gallery/showgallery.php?cat=12510

Ps: I posted this from my phone using the Blogger App. What do you think? Does anyone have a better app they can suggest?

March 12, 2012

Monkey Business

Hi Everyone!

Sorry for the lack of posts. I have been crafting but I have been bad about posting them because I'm training for a half marathon. Running is taking over my life. At least it is a healthy habit! Plus good news: I got an interview for physiotherapy school! Yeah!!! I just had it this past weekend so I'm trying to fill my time off with crafting and running to prevent myself from going crazy thinking about whether or not I will get in.

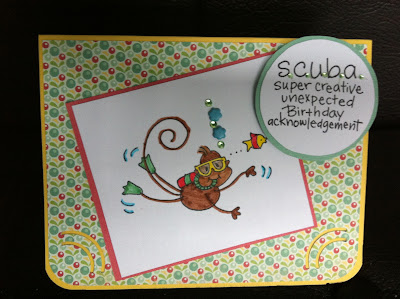
I recently went shopping with a friend of mine looking for clothes for an upcoming trip to Maui. I bought this fantastic crazy monkey tank top. Everything is about monkey business for me this week! So I have been utilizing some of old stamped images my sister gave me. Got to love Changito by Stampendous!


SCUBA = Super Creative Unexpected Birthday Acknowledgement
Markers= Crayola Super Tips 
Yellow Paper = Stampin' Up
Rounded Corner = Fiskars Round Corner Punch (bought at Michaels)

I have been reading some blogs lately that use the round corner punch. I think it really finishes off the card . The particular punch that I bought has two round punch outs that I didn't realize till the first time I used it. I thought I might have to take it back but once I saw the results I really like the extra touch it gives. I may have to go buy another one that doesn't have the addition punch outs. Perhaps I will pick up the Paper Shapers Corner Adorner at Walmart as suggested by Christina of Making, Baking & Picture Taking.

Happy Carding!

January 22, 2012

Scraps of Maui

After much carding I have been getting a hankering for another kind of paper project. I finally went back to working on my Maui scrapbook from my trip last February. After printing out a couple of the pictures I only had about one hour to work on the scrapbook. Before I always needed a couple hours to do any scrapbooking. There were very few moments during the average week to do any scrapbooking. However, I realized that between the paper, stickers, and Cricut I could whip out a scrapbook page lickity split.  Without the Cricut I did most of the titles on the computer. Now I can just type it out in the Cricut. If you can't tell I highly recommend a Cricut if you are considering getting one. Here are a couple of pages from before and after:

Before:


After:


The album I bought in one of the Hawaiian Marketplaces. My MIL found a scrapbook package at Winners at a great deal. The rest I picked up at Michaels.

As far as my style goes I like to border most pictures to help them stand out off the page. This way the picture is the showcase. After that I usually use only a couple stickers or die-cuts to accent the pictures. I don't like too many decals or rhinestones when scrapbooking. I'm always afraid the rhinestones might wreck my pictures.

Any suggestions for the rest of the scrapbook? How would you describe your scrapbooking style? Suggestions for good scrapbooking blogs?

January 16, 2012

My Secret Valentine

Well it's a Vancouver miracle! It is finally snowing. Not just one day but three consistent days of snow. That means that all the west coast crafters have locked themselves inside for 3 days straight. My most recent card has been a secret valentine's day card for the boy. He is forbidden from reading this because I can't wait to post this one.

"A Secret Valentine"
Envelope = Sweethearts Cricut cartridge
Hearts Paper = Boxing Day Sale at Michael's
Card stock = Recollections at Michael's

Sweetheart Cartridge
1. Cut a shadow image in red
2. Cut a image in pink
3. If you want the heart a different colour then cut your desired colour using the layers feature

I'm loving the Cricut cards! What are your preferences crafters? Do you like the stamps or Cricut cards?

January 8, 2012

A Very Cricut Christmas

Happy New Year Crafters!

I have been very bad about updating my blog but it is not due to late of projects. Just to keep you updated I did finish my 22 Christmas cards. Everyone seemed quite impressed! I was just excited because this was one of the first years that we started receiving our own Christmas cards. I was included in some of the Christmas cards addressed to the boy's family too.

Santa was very good to me this year and brought me..... a CRICUT. I know you are jealous but that is only normal. But seriously, the boy's mom gave it to me. I was so shocked! It turns out she almost gave it to me early in order to finish my Christmas cards.

Here are a couple of experiment's with my new cricut:
"Happy Birthday"
Cricut Cartridge: Paper Lace

"Birthday Blessings - Cupcake"
Cricut Cartridge: All Wrapped Up


"Just Married"
Cricut Cartridge: Sweethearts

It definitely took some getting used to. Trying to find the right pressure, speed and blade setting to cut through the paper but not tear it up too much was difficult. However, once you get use to it it becomes much easier. My card making has been taking up much less time! 
Here are a couple bits of Cricut advice:

1) The Sweetheart cartridge only cuts all layers at one time. You cannot choose which parts you would like to cut out of a particular colour or pattern. *To reduce paper waste make multiple images using all the scraps at one time. This is what I did with the "Just Married" card.

2) If you would find it annoying to have all the layers cut out at once then choose a cartridge like All Wrapped Up. This cartridge allows you to cut each layer separately rather than all at once.

3) I highly recommend you pick up a set of the Cricut tools. These tools allow you to peal the paper off the mat, make extra cuts in your image, poke out delicate cut outs, etc.

If you have any cricut advice please let me know.

Oh and check out this new blogger: Christina Mynen